Games for the Web (Fall 2019) Assignment #1. DIY
Step One. Planning
Please take a few minutes to glance over the appended list of odd projects, circling any of the items that are new and completely unfamiliar projects. These quirky, inexpensive DIY projects would work well for this assignment, but you should not feel limited to the examples on this list. If you mine the Internet with search phrases like “inexpensive DIY projects” or “weird DIY projects” or “projects for makers,” you will find plenty of options.
Your DIY project must be something outside your comfort zone, the scope should be reasonable, and working on this project should not put you (or anyone else) at risk. If you plan to use unfamiliar tools (e.g. saws, drills, soldering irons) please make sure that you find someone who can teach you how to use those tools safely.
- Using pieces from an old DVD player, convert your phone’s camera into a super-high-quality macro lens.
- Using a machine or sewing by hand, create a fur cover for your laptop.
- Install Linux on an old computer and turn it into a dedicated multimedia server.
- Create a video camera stabilizer with materials found at Home Depot
- Create your own t-shirt design using stencils and bleach.
- Make a clock out of color samples (e.g. the types of paint samples you might get from Home Depot)
- Create an ant farm from scratch.
- Create a Halloween costume from scratch. (Note: Sewing, dying, or some sort of unfamiliar costume-making technique should be involved in this.)
- Create a colorful purse out of plastic bags.
- Create your own glow-sticks with chemicals you can acquire from a science store such as Analytical Scientific.
- Go fly a kite. Actually, to be more specific: make a kite and then fly it.
- Booby trap a bottle of soda with Mentos so it safely explodes when opened.
- Bake your own bread from scratch.
- Create a wallet out of potato chip bags.
- Make your own beef jerky from scratch.
- Use household ingredients to dramatically boost the signal of your wifi router.
- Turn an old PC into a “Hackintosh.”
- Use a soldering iron and an old pair of sunglasses to create “spy glasses” that will record audio and video of what you see and hear.
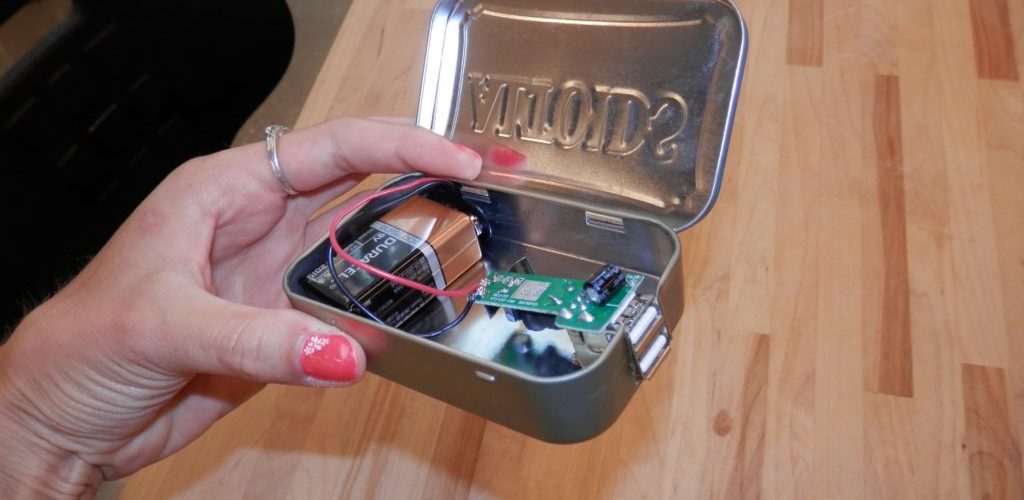
- Create a solar powered emergency radio from an Altoids tin.
- Make an inductive metal ring that will light up when aligned with a magnetic field.
- Make glowing earrings or other jewelry out of LEDs.
Step Two. Reflect on your personal experiences as a learner
It has taken us approximately 2,000 years to realize that different human beings learn in different ways. Some people prefer to jump into a new knowledge domain by “jumping into the deep end” and learning as they go. Others prefer to do extensive research up front before taking any actions. When it comes to learning a new skill such as cooking, programming, or repairing a broken lightbulb fixture in the shower, some people are more drawn to video tutorials, some people appreciate written instructions that are accompanied by extensive images and diagrams, and some people are perfectly happy reading through a text-heavy manual.
A growing body of research investigates “multiple intelligences.” For example, Howard Gardner argues that human learning styles include musical, verbal, physical, interpersonal, visual, logical, intrapersonal, and naturalistic learning styles. These ideas were trendy in the late 2000s, but many contemporary educational researchers have doubts about their practical utility and theoretical underpinnings.
Whether or not one embraces Gardner’s theories, most educators agree with the claim made in the first sentence of this section: Different human beings learn in different ways.
Reflecting on your entire academic career, think about the various classes that you’ve taken. What approaches are most helpful when you are learning new material? When have you felt most satisfied with your mastery of unfamiliar concepts? When have things been more difficult? Do you find that different approaches make sense for different types of material? For example, do you learn about Roman history in fundamentally different ways than you might learn about Adobe Photoshop? Write down your answers to these questions. The notes that you take during this step will be invaluable when writing up the blog post that accompanies the project.
Step Three. Tracking Down Resources
During the next few days, track down and review at least four different tutorials that can help you learn how to accomplish this task. Some of these tutorials might actually be focused on a sub-skill that is required to complete the project. For example, if you’re creating a wallet out of potato chip bags, you might need to examine some basic tutorials on sewing. If you’re baking bread from scratch, you might need to examine some basic tutorials on cooking and baking.
Look for a range of different instructional media (e.g. not just YouTube videos, not just forum postings, not just technical manuals). Bookmark all of these sources because you will need to credit them later. Figure out what you need to do and what physical resources – if any – you will need to complete the project. After skimming these materials, take a few minutes to share your thoughts via the “DIY Project Survey” posted on TLEARN. Please be sure to complete this survey no later than 9:00 am on Wednesday, August 28th.
Step Four. Tackle the project
After reviewing instructional tutorials and locating necessary materials, the next step is to actually tackle the project. Take it slow and allow yourself to have fun with this. Document your creative process along the way by maintaining a journal, taking photographs, capturing screenshots, and/or using your phone’s video camera to capture key moments of the process. This documentation will be useful when writing your blog post and when delivering your short presentation to the class.
Step Five. Crediting your inspirations
This step is not about APA citation style. It is about identifying and crediting the resources you used. There are a few important things you need to do here:
- Figure out who authored the resource. After all, YouTube is just a delivery platform. All videos are also linked to authors and channels. You will need to identify both of these things in this section.
- Make sure that you know who someone is and not just their name. If the author of a tutorial is named Riotgrrrl78, that’s part of what you need to know. You should also try to figure out everything else. What sort of details does she share about herself? Why is she writing this tutorial?
- Also, ask questions about where the piece was published, whether it is a YouTube channel or a blog or some apparently random site on the web. Is it published on a personal blog? What can you determine about this blog? You might determine that some of your resources are published on clickbait blogs that exist solely to generate hits. That is absolutely OK as long as you fold that into your explanation.
- Give credit to these people. For example, this is how you might do the same thing on the animation assignment:
Credits
The two main animated characters in my animation were actually created by a Netherlands-based game design studio called “Kenney.” I converted their game sprites into nested movie clips. I pulled Mario from the “Classic platform pack” and the animated dragon was taken from the “platform brick pack.” (ß Hyperlinks should point back to the pages where you got these assets.)
My scrolling backgrounds were made possible by a pixel design artist named Jason Mercado who shared his Panoramic Backgrounds with the community on the site Open Game Art. (ß Link back to the author’s individual page if it exists, link to the specific page where you found the assets.)
The race car in the final scene is a modified version of a vector file posted on the site FreePik, and it was created by an artist named Kian Sandjideh.
My background music was created by my roommate Paul Kantner and his friend Grace Slick. I am grateful to all these creators for helping make this animation possible.
Step Six. Talk about what you did.
This assignment will culminate in two deliverables: a self-reflective blog posting and a short slide deck that will structure your three-minute presentation to the rest of the class. Your blog posting is due before class on Friday, September 6th. It should be four to six paragraphs long, and it should address the following questions:
- What was the nature of your project, and what concerns did you have when first tackling this?
- What sorts of problems did you encounter along the way?
- What types of guides or tutorials did you track down? Why created these resources? Why did the authors create these resources, and did you find them to be credible?
- What source was most helpful? Along the way, did you find that certain types of materials (e.g., video clips, instructional web pages, or technical manuals) were particularly useful? What was it about the good resources that made them most effective?
- Be sure to connect this discussion to your reflections about your own experiences as a learner.
- Why do you think this assignment is on the course syllabus?
- Include a credits section at the end such as the one described above.
You should also upload a short PowerPoint slide deck that demonstrates your process. This deck will be composed almost entirely of photographs, screenshots, and videos that document your creative process. This should not be a text-heavy deck. With the exception of your title slide, none of your slides should have more than three words on them. As you click through the slides, discuss your challenge, explain problems that you encountered along the way, and highlight strengths and weaknesses of your instructional guides and tutorials. Please upload your presentation to TLEARN before 11:00 a.m. on the morning of Friday, September 6th.
We won’t be able to cover all of the DIY presentations on the 6th, so we will finish up the second batch of presentations on Monday (9/9).
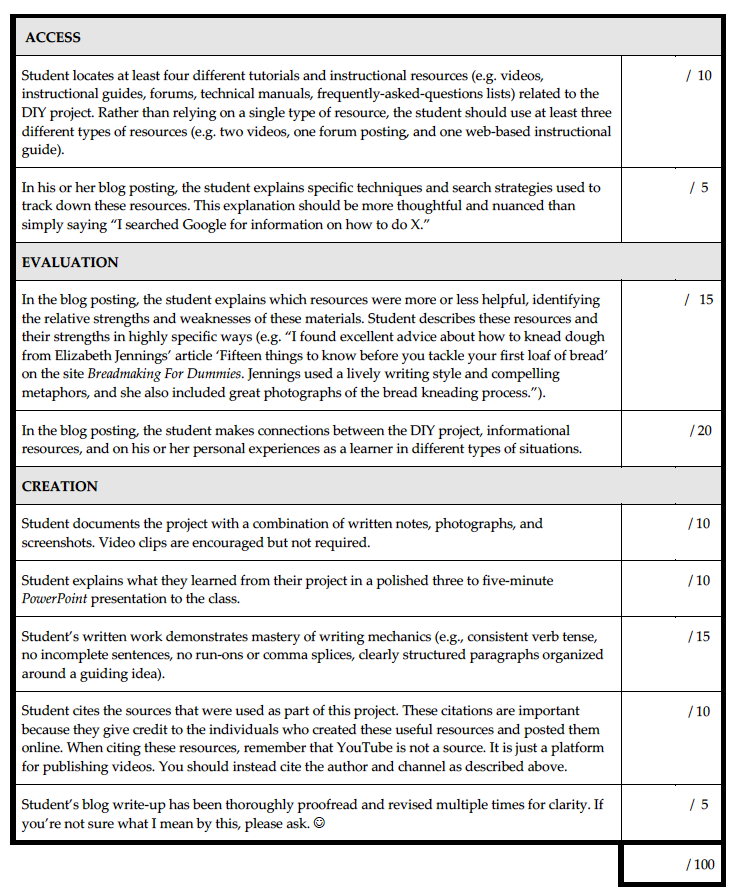
Grading
Your grade is based on your explanation of the project in both your blog posting and your class presentation. Please closely read the rubric and use it to structure your blog response. Almost all of the points on this assignment are linked to the way you explain your process in the blog posting.


Leave a Reply